Quickstart
You will need
Check that you have received all the parts listed on the first page. Should anything be missing, please contact your dealer.
info
If the device’s temperature differs from the ambient climate, it should be left to acclimatize before setup. In this case, wait for approximately two hours before connecting the device to the power supply.
We recommend that you perform the initial setup at your desk, before installing it at the intended location. You will require the following:
- A PC with a current web browser.
- A power supply: Either
- the adapter included in the set or
- a lab power supply or
- a POE power adapter
- An Ethernet cable and a free Ethernet port to connect the device to the network that your PC is using. Alternatively, the device can be connected directly to your PC via an Ethernet cable.
danger
Never use the device with a defective power adapter! Risk of death from electrical shock!
First Steps
1
Connecting to the networkConnect the device's ethernet port via an ethernet (network) cable to your network, that your computer is part of and you intend to use for the configuration.
The device can be connected to a WiFi network at a later time.
2
Supply the device with power
Use either of these 3 alternative ways:
Use either of these 3 alternative ways:
- Prepare the power supply that is supplied in the set by inserting the plug that is
used in your country.
Now connect the device to the power adapter, by plugging it into the coaxial power supply port on the back side of the device. -or- - connect your lab power supply to the Power supply screw terminal -or-
- if you have connected the ethernet cable in step 1 to a POE power supply, there is nothing further to do.
3
Accessing the Web Interface
Open your web browser and enter
The system name in factory settings looks like
The six zeros correspond to the last 6 digits of the MAC address of the Ethernet interface, which is printed on the sticker on the back side.
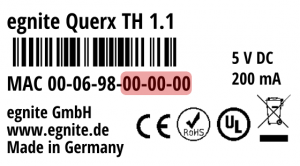 //TODO: use correct image
Open your web browser and enter
http://system name.local/ into the address line.The system name in factory settings looks like
egnite000000.The six zeros correspond to the last 6 digits of the MAC address of the Ethernet interface, which is printed on the sticker on the back side.
success
You should now have access to the web interface.
Next Steps
After gaining access to the web interface, the recommended next step to take include:
- Proceed with making yourself accustomed to the web interface and the Dashboard.
- Read on typical operation for an overview of the intended use of the device.
- Securing the web interface from unauthorized access, by setting up a admin user. Optional, but recommended.
- Configuring the network connection (Ethernet, WiFi, WiFi AP)